

Overview
The instructions below will show you how to set up Softaculous on ISPConfig.
Note: Softaculous does not support Multi Server setup of ISPConfig Panel yet.
Requirements
- A server with ISPConfig panel installed
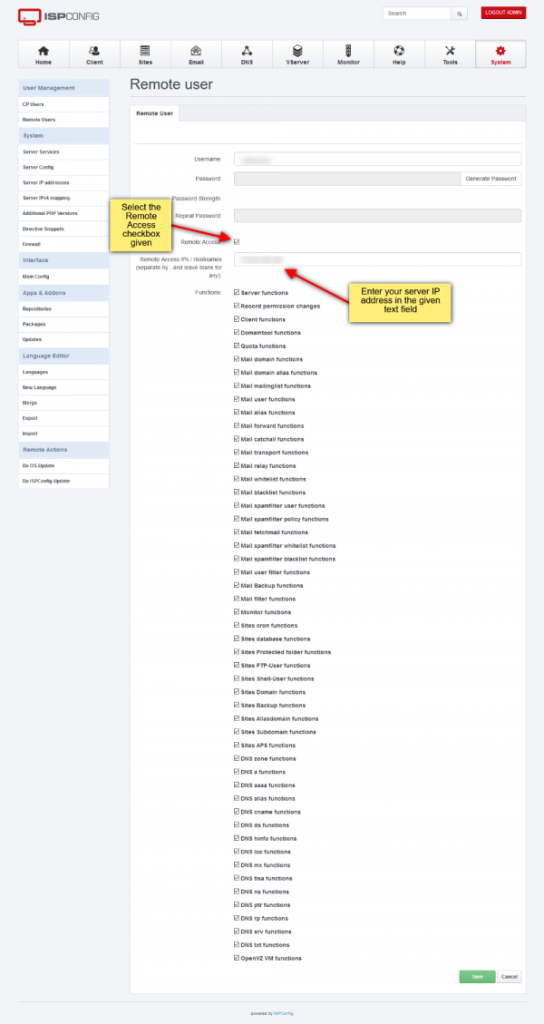
- Make sure you have created a Remote User in ISPConfig Control panel by going to the System tab and then click Add Remote User on the left
- Access to Server, Client and All Site functions are required to the Remote User.
- For ISPConfig 3.1+ make sure you have selected the Remote Access checkbox and added your server IP in Remote Access IPs/Hostnames textbox while adding the Remote User.
- ionCube Loaders must be enabled
- If you have firewall enabled, then please allow access to *.softaculous.com
- suHOSIN must me disabled
- Make sure that the following PHP modules are enabled in loaded PHP binary:
- mysqli/mysqlnd
- curl
- soap
- posix
- json
- xml
Note: The following domains are used to download the script packages, so please allow access to them through your firewall.
192.198.80.3 # api.softaculous.com
158.69.6.246 # s1.softaculous.com
138.201.40.168 # s2.softaculous.com
213.239.208.58 # s3.softaculous.com
138.201.24.83 # s4.softaculous.com
167.114.200.240 # s7.softaculous.com
Installing Softaculous in Interworx
Note: Before starting the installation make sure ionCube Loaders are enabled. Otherwise you will not be able to Install Softaculous. The ionCube Loaders can be downloaded at the ionCube Downloads
Now SSH to your server and enter following commands:
wget -N http://files.softaculous.com/install.sh
chmod 755 install.sh
./install.sh
Note : ./install.sh should be executed as root. So for ubuntu users add sudo before ./install.sh
The Installer will begin to display the Installation Processes and will indicate when they are complete. NOTE: During this process, scripts will be downloaded. The Download Activity will be displayed on the screen as well.
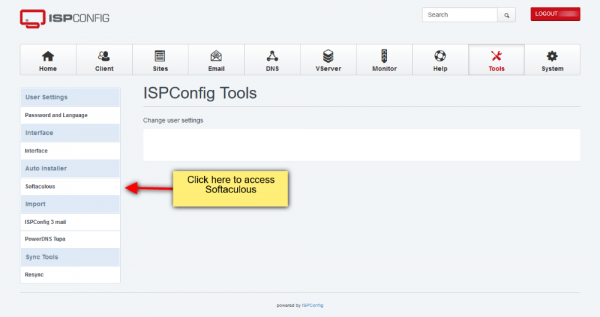
If the installation was successful you can visit the Softaculous panel after logging into the ISPConfig panel :
You can also visit http://YOUR_IP:PORT/softaculous to access Enduser Panel.
That’s it!! The installation of Softaculous is completed.
Set Remote Access setting for remote users
You must enable Remote Access and add your server IP to the Remote Access IPs/Hostnamestext field in ISPConfig 3.1+ in order to access Softaculous.
Quick Installation in ISPConfig
This method is useful if you want to complete the installation quickly and then download the script packages in the background.
Make sure ionCube Loaders are enabled before beginning the installation. Ioncube is required by Softaculous Installer. Now connect to your server via SSH and run the following commands:
wget -N http://files.softaculous.com/install.sh
chmod 755 install.sh
./install.sh --quick
Using Proxy settings
If you want Softaculous to use proxy settings then you can simply pass the parameters and Softaculous will use the proxy setting provided by you.
wget -N http://files.softaculous.com/install.sh
chmod 755 install.sh
./install.sh proxy proxy_ip=YOUR_IP:PORT proxy_auth=USERNAME:PASSWORD
Proxy Parameters :
- proxy_ip (Required) : Enter your Proxy server’s IP and port.
- proxy_auth (optional) : Enter the proxy server’s authentication details i.e. Username and Password
Common Issue
Blank Page is displayed when Softaculous is accessed.
Problem : PHP Extension mysql and mysql.so is not loaded by Softaculous
Solution: Append the following lines in /usr/local/softaculous/php.ini
extension=mysql.so
extension=mysqli.so
extension=curl.so
extension=soap.so
extension=posix.so
extension=json.so
extension=xml.so
extension=ftp.so
extension=mbstring.so
extension=simplexml.so
extension=zip.so
Also create the directory /usr/local/softaculous/conf and create the file /usr/local/softaculous/conf/custom.ini with the same contents above. So when Softaculous is upgraded to newer version, it will check for php options added by user in custom.ini and will append the contents in new /usr/local/softaculous/php.ini
Note: If mysqlnd is enabled on your server, add it at the top of the above extensions list in php.ini file as:
extension=mysqlnd.so
extension=mysql.so
extension=mysqli.so
extension=curl.so
extension=soap.so
extension=posix.so
extension=json.so
extension=xml.so
extension=ftp.so
extension=mbstring.so
extension=simplexml.so
extension=zip.so